Fun with Patterns
Fun With Patterns
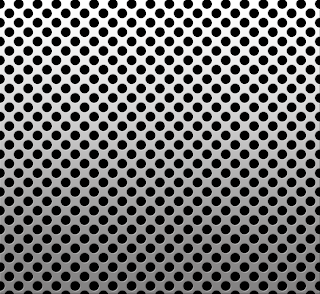
Creating patterns in Illustrator and Photoshop can be a blast. No, seriously. So, I was trying to come up with something that looked like a metal grid. Something like this:
I started in Photoshop, creating a new document that was a half inches wide, by a half inches high. I put two grid lines, one vertical, one horizontal, to find the center point. Then I drew a black circle in the middle with the Oval Shape tool. I copied the circles into the each corner, roughly centering each circles mid-point to the corners. Not easy to do, since Photoshop doesn’t allow you to see off-canvas objects. Then I turned off the background layer, and hit Command (Control) + Option (Alt) + Shift + E to isolate all of the vector shape objects onto a separate layer. I turned off all of the other layers and went to Edit to Define Pattern. Give the pattern a name and now I’m ready to go.
Unfortunately, when defining a pattern in Photoshop, it doesn’t preserve transparent areas. I created a new document and filled it with the pattern on a new layer. Hiding the background layer, I noticed that the black circles had a white background. “Tartar Sauce!”
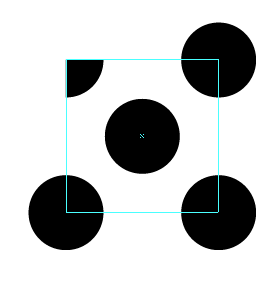
So, then I figured, I’d take it to Illustrator. Even easier. In Illustrator, grab the Rectangle tool and click once. Set the width and height to a half inch. I need this square only as a guide, so I hit Command (Control) + 5.
Then I select the Oval tool and draw a black circle in the middle of the guide. Option (Alt) drag copies of the circle into each corner, registering the circles mid-point for each corner. In Illustrator, I need to clip the outside portion of the circles in the corners. So, I draw another square directly over the guide. This square needs no fill or stroke. Select that square and all of the circles in the corners, then go into the Pathfinder panel and choose Divide. Now, I can delete the portions of the circle I don’t need with the Direct Selection tool.
Finally, select the entire set and choose Edit to Define Pattern. Give the pattern a name and click OK. The pattern will appear in the Swatches panel. Draw out a larger rectangle and then click on the pattern to fill it.
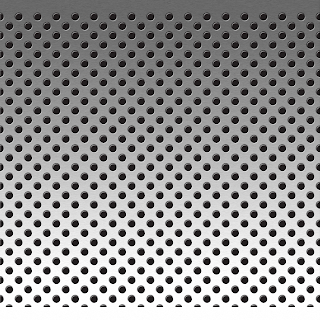
Then I selected this rectangle, pasted it as a Smart Object into a new Photoshop file. I added a few Layer Styles and put in a ‘brushed metal’ background and got this:
Which is pretty cool, but not where I need to be. It turns out that the pattern I created in Illustrator needs to be reversed.
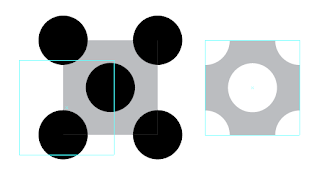
Starting the process all over again, I created the half inch square and set it as a guide. Then I drew in my black circles in the middle and corners. Then I drew a gray square over everything and sent it behind, Command (Control) + [. Selecting everything, I did a Pathfinder Divide again and then deleted all of the circles. Here’s what I ended up with:
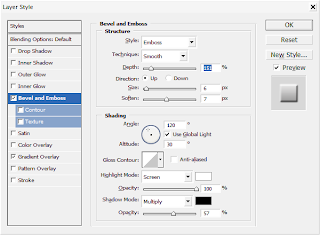
Select what’s left over and then choose Edit to Define Pattern again. Create a new Rectangle and fill it with the final pattern. Select the rectangle and then bring it into Photoshop as a Smart Object. I added the following Bevel and Emboss layer style settings:
And then added a gradient overlay, from a medium gray to a light gray. Then I changed the background to black and Voila! I got what I was looking for.
Creating patterns in Illustrator and Photoshop can be a blast. No, seriously. So, I was trying to come up with something that looked like a metal grid. Something like this:

I started in Photoshop, creating a new document that was a half inches wide, by a half inches high. I put two grid lines, one vertical, one horizontal, to find the center point. Then I drew a black circle in the middle with the Oval Shape tool. I copied the circles into the each corner, roughly centering each circles mid-point to the corners. Not easy to do, since Photoshop doesn’t allow you to see off-canvas objects. Then I turned off the background layer, and hit Command (Control) + Option (Alt) + Shift + E to isolate all of the vector shape objects onto a separate layer. I turned off all of the other layers and went to Edit to Define Pattern. Give the pattern a name and now I’m ready to go.
Unfortunately, when defining a pattern in Photoshop, it doesn’t preserve transparent areas. I created a new document and filled it with the pattern on a new layer. Hiding the background layer, I noticed that the black circles had a white background. “Tartar Sauce!”
So, then I figured, I’d take it to Illustrator. Even easier. In Illustrator, grab the Rectangle tool and click once. Set the width and height to a half inch. I need this square only as a guide, so I hit Command (Control) + 5.
Then I select the Oval tool and draw a black circle in the middle of the guide. Option (Alt) drag copies of the circle into each corner, registering the circles mid-point for each corner. In Illustrator, I need to clip the outside portion of the circles in the corners. So, I draw another square directly over the guide. This square needs no fill or stroke. Select that square and all of the circles in the corners, then go into the Pathfinder panel and choose Divide. Now, I can delete the portions of the circle I don’t need with the Direct Selection tool.

Finally, select the entire set and choose Edit to Define Pattern. Give the pattern a name and click OK. The pattern will appear in the Swatches panel. Draw out a larger rectangle and then click on the pattern to fill it.
Then I selected this rectangle, pasted it as a Smart Object into a new Photoshop file. I added a few Layer Styles and put in a ‘brushed metal’ background and got this:

Which is pretty cool, but not where I need to be. It turns out that the pattern I created in Illustrator needs to be reversed.
Starting the process all over again, I created the half inch square and set it as a guide. Then I drew in my black circles in the middle and corners. Then I drew a gray square over everything and sent it behind, Command (Control) + [. Selecting everything, I did a Pathfinder Divide again and then deleted all of the circles. Here’s what I ended up with:

Select what’s left over and then choose Edit to Define Pattern again. Create a new Rectangle and fill it with the final pattern. Select the rectangle and then bring it into Photoshop as a Smart Object. I added the following Bevel and Emboss layer style settings:

And then added a gradient overlay, from a medium gray to a light gray. Then I changed the background to black and Voila! I got what I was looking for.
Labels: Illustrator CS3, Patterns, Photoshop CS3
posted by alemieux3 at 9:13 AM
![]()


1 Comments:
Hi,
I found an image at http://usingillustrator.blogspot.com/2008_12_01_archive.html
This is a cool pattern image.
I want to modify and use this pattern image in my little application as a part of background.
Please allow for me using this image.
thank you in advance.
Post a Comment
<< Home